Cultivate! Sow! Harvest!
Welcome to the Official Rules of The Great Harvest, the trading card game that brings the farm to your table where a variety of Crops and Animals is yours to command!
There are dozens of Crops and Animals to choose from, as well as the Tools you need to grow them, so where do you start? Each player needs a deck of at least 50 cards (60 for Tourneys) and a theme deck has everything you need to get started. Each of these ready to play decks come with the Crops and/or Animals you’ll need to raise those Profits, as well as all the Tools you’ll need to get you there. If you prefer to build your own deck, you will likely need several booster packs, each holding 17 randomized cards. When building your own deck, you may not have more than four copies of any uniquely named card. For example, you may not have five or more Sweet Corn in your deck, but you may have five or more different Grain Class cards.
If you want a larger collection of cards to choose from, try the Booster Box! It boasts over 100 cards in one set. The cards are still randomized as they are in the Booster Packs, but it is only in the Booster Box where you can get your hands on special foil versions of Crops and Animals! Once you have your deck put together, read on for rules on how to play The Great Harvest!
The following are the current rules for The Great Harvest and may be subject to updates, so be sure to bookmark this page if you want to be up to date with the rules. The rules laid out here override any rules that may be out in the game’s materials, such as the rule booklets that came with the 1st Edition theme decks.
Also look for Tournament Standards, as noted by “Tourney.”
Game Objective: Players place down Crop and Animal cards and build Combos with Tool cards in order to earn Profits. The first player to have their Profits reach or surpass the Top Value wins!
Equipment: Each player needs a 50-card minimum deck. The theme decks already fulfill this requirement and so are a great start for new players. Players also need a method to track Profits. A 20-sided die is ideal, but pencil and paper work just fine. A 6-sided die is also needed and can be shared between players. This is called the Market Die and currently is only relevant to Storage Tool cards.
Tourney Equipment: Deck minimums are increased to 60.
Top Value: This is the ultimate goal players are trying to reach by building their Profits. Players should agree on a Top Value to attain which will determine the length of the game. To help players decide, 15 Profits makes for a short game and 30 Profits makes for a longer game.
Tourney Top Value: Top Value is set at 30 Profits.
Types of Cards
Your deck includes a number of Crops, may also have some Animals, and will likely have a number of Tools to bring it all together. Let’s take a closer look at the different kinds of cards the game has, beginning with Crop type cards.
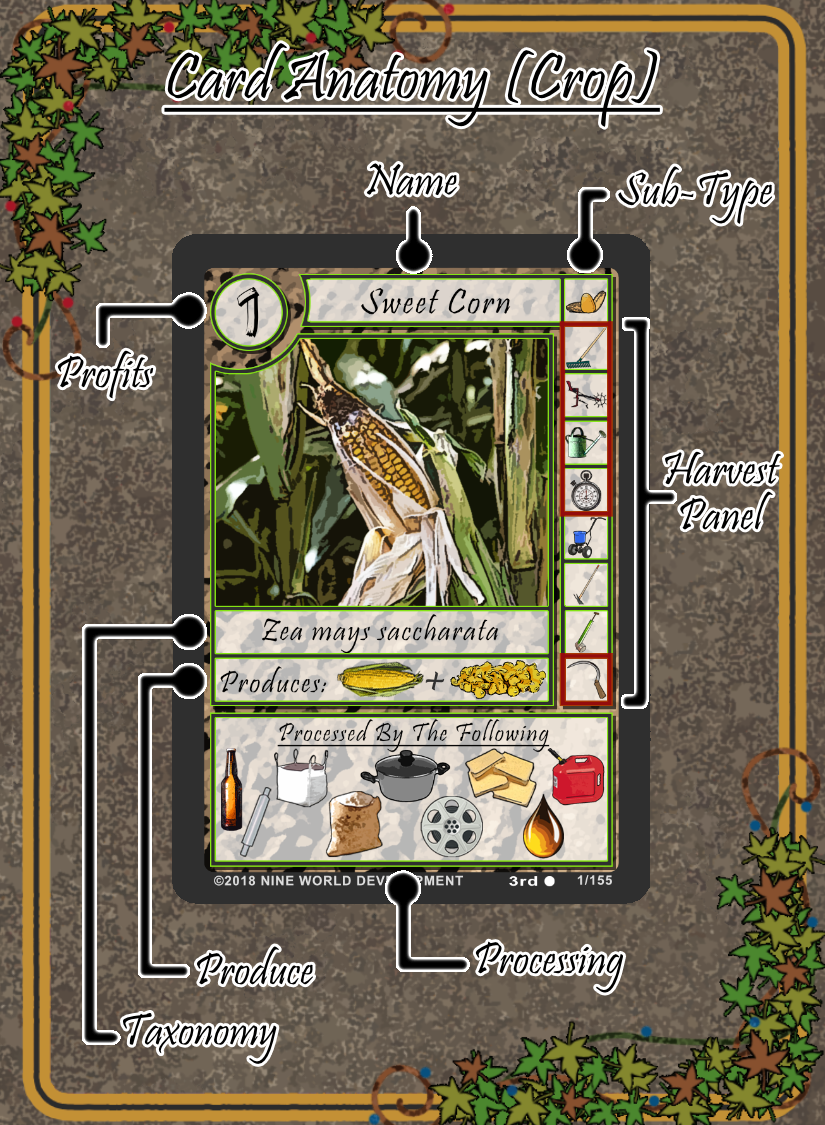
Crops are the most foundational card type in the game. Even many of the Animal cards need a Crop or two to grow. Crops overall are very much alike. Here are some of the things they share:
Profits: This number represents the amount of Profits the Crop yields when you finally turn it in. Of course to do that, you have to grow it properly with the minimum number of Tools and finally using the correct Harvester.
Name: Often used as reference by other cards, particularly Tools. This is the unique name for the card. Remember that you must not have more than four of any uniquely named cards in your deck.
Sub-Type: This is the panel to the right of the Crop’s Name. The symbol represents the specific type of Crop.
Harvest Panel: We’ll explain this further down
Taxonomy: Scientific Classification of the Crop. Mostly just a neat tidbit.
Produce: Shows what the Crop produces in terms of resources when Harvested. Mostly referenced by Animals in regards to their Feed.
Processing: Shows the symbols of Advanced Tool cards that may be placed on the Crop after it has been Harvested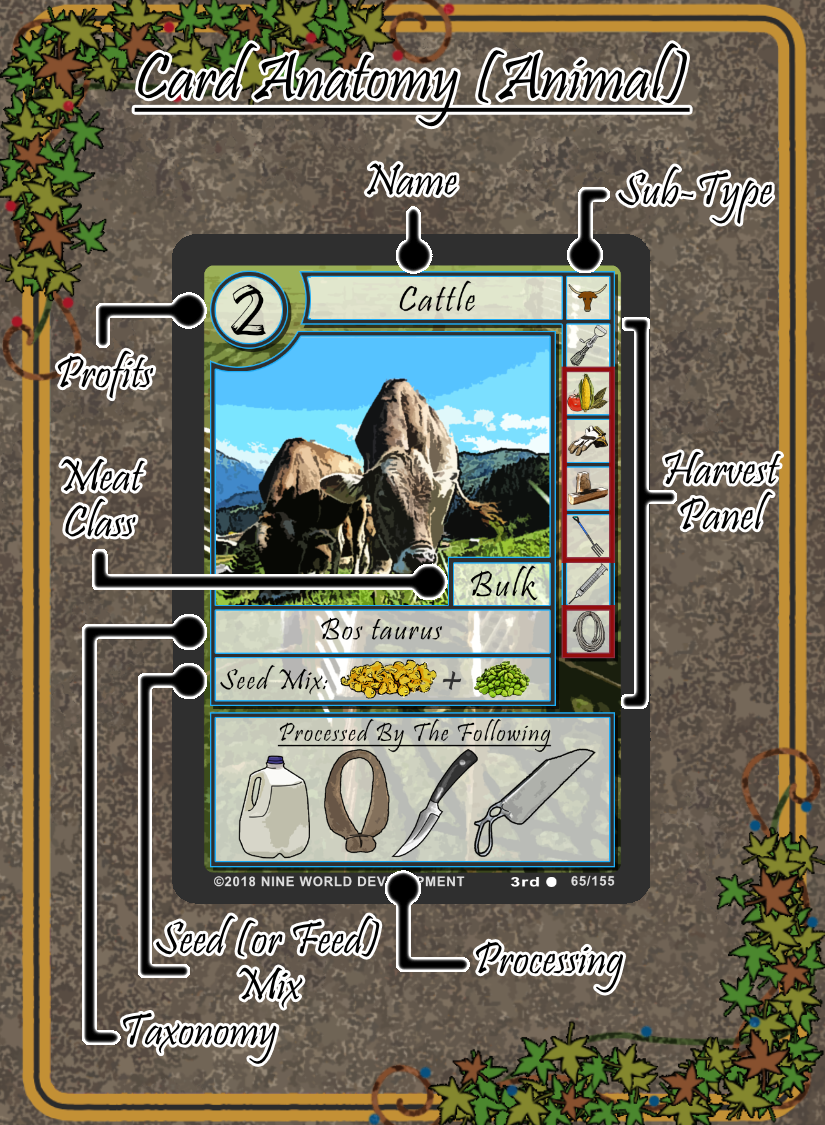
Animals are a bit easier to raise than Crops, but more importantly can take a Crop’s Profits to a greater level.
Profits: Again, like Crops, this number represents the Profits the Animal yields after it has been Harvested.
Name: Same as Crops.
Sub-Type: Same as Crops.
Harvest Panel: Just a little further down.
Meat Class: This just denotes the type of meat produced by the Animal. It is often referenced by Tool cards.
Taxonomy: Same as Crops.
Seed (Or Feed) Mix: This shows the resources needed to feed the Animal. This can be either a Crop or another Animal. It is more beneficial to fully develop the Feed beforehand, but not necessary to get the Animal’s base Profits.
Processing: Same as Crops.

Tool cards are used for raising Crops and Animals. They usually add Profits to the Combo, although some are essential in order to turn in Profits from Crops and Animals.
Profits: Shows the amount of Profits the Tool adds to the Combo.
Name: Often referenced by other Tools. You will notice certain Basic Tools have their names in red. This is to help reference the Tools that are generally needed in a Combo.
Type: Just shows the general Type of card as a Tool.
Sub-Type: Basic Tools and Harvesters will have this extra panel. The symbol is used as a reference to the symbols on the Harvest Panel of Crops and Animals.
Class: The more general Type of card.
Instruction: Tells when and how to use the Tool.

Crops and Animals have a Harvest Panel on the right side of their main image. Pictured above are the Crop’s panel on the left, the Animal’s panel in the middle, and the Sea Stock Animal’s panel on the right. The Harvest Panel is a useful reference for what kind of Tool cards you need to raise the Crop or Animal. They show all the Basic Tools you must use, meaning necessary, the Basic Tools you may use, meaning optional, and finally the symbol for the Crop or Animal’s Harvester. All of these symbols correspond to those on the Basic Tool and Harvester cards themselves.
The Harvest Panel also shows the order the Tools need to be played in, with some exceptions. For more explanation of the order Tools should be played in, scroll down to Minimum Requirement.
Two symbols are unique on the Harvest Panel. They are  and
and  . The first represents the Growth Phase and when it must be used. The second represents Feed and when it must be used.
An important thing to note are the red boxes. These signify which Tools are necessary to the Crop or Animal. If it’s in a red box, you will need to play the Tool card if you want to complete the Combo.
How To Play
Now that you understand the cards a little better, it’s time to learn how to use them and play The Great Harvest.
Preparation: Select a player to go first. Each player begins by shuffling their deck and then placing it face down in front of them to the right side of their play area. This is known as the Farm Supply. Each player then draws seven cards from their Farm Supply. Note that this is the maximum number of cards a player can have in their hand. If they have more than seven cards at the end of their turn, they must discard down to seven. Discarding cards in this manner does not count as a Labor. Next, everyone should decide on the Top Value to attain. Remember that 15 Profits make for a short game and 30 Profits make for a longer game.
Labors: During each player’s turn, they have three actions, called Labors, to perform. They must perform three separate Labors, the same Labor up to three times, or some combination of the two. The following Labors may be selected from and performed:
- Place a Crop or Animal card in front of you. This area is known as The Farm.
- Place a relevant Basic Tool card on a Crop or Animal card you currently have on The Farm. Place the Tool over or under the Crop or Animal card to show you have begun a Combo.
- Choose a Crop Combo you have on The Farm and declare a Growth Phase for it. You can notate this with a small object or by turning the combo sideways. You may also place a Growth Phase token card on the Combo.
- Place an appropriate Feed on an Animal. It can only be placed before a Feeder.
- Place an appropriate Harvester on a given Combo that has met its Minimum Requirement with Basic Tools.
- Place an appropriate Advanced Tool on a given Combo that has been Harvested.
- Place an appropriate Facility Tool on a given Combo that has the necessary Advanced Tool.
- Place an appropriate Storage Tool on a given Combo that has been Harvested.
- Turn in a Combo for the combined Profits of all cards placed in the Combo. The Combo is then discarded to the Compost Pile.
- Draw a card. If there are no more cards in the player’s Farm Supply, they shuffle and Recycle their Compost Pile and place it as a new Farm Supply to draw from, and may then draw as they would normally.
After a player has used their three total Labors, play continues on to the next player.
More About Tools
Tools are used on Crops and Animals to build Combos toward Profits. There are currently five Classes: Basic Tool, Harvester, Advanced Tool, Facility, and Storage.
Basic Tools: These are used to start the Combo, after the Crop or Animal has been placed on The Farm. They are the first Class used and are usually placed in a specific order which is indicated by the Harvest Panel and of course the Instruction on the Tool itself.
Harvester: These are placed after all necessary and optional Basic Tools. It is only after placing a Harvester that a Combo may be turned in for Profits.
Advanced Tools: After placing a Harvester, a player may use these to add more Profits to the Combo before it is turned in for Profits. Only one Advanced Tool may be used in a Combo.
Facility: These are used after Advanced Tools, and are placed on specific Advanced Tools. These, too, are limited to one per Combo.
Storage: These are placed last. After placing one, the player rolls the Market Die and adds the amount shown in Profits to the final Combo. These, too, are limited to one per Combo.
Minimum Requirements
There are a number of Basic Tools that must be played in a Combo before a Harvester can be used. These are signified in the Harvest Panel by the corresponding Sub-Type symbols in Red Boxes. They are also signified on the Tool cards themselves with Red Text in their name, as well as the Sub-Type symbol on the Tool card.
For Crops, the player must place a Cultivator, Seed Sower, and Irrigation and in that order to begin a Combo. Crops also require at least one Growth Phase after Irrigation has been placed. After the Growth Phase, a Harvester may be placed to complete the Combo. Keep in mind Harvester Tool cards will not reference the Growth Phase, but a Growth Phase is nonetheless required BEFORE placing the Harvester.
For Animals, the player must place at least one of the required Feed followed by a Feeder. Next, the player needs to place a Bed Spreader and a Water Trough, although these may be placed in either order. Finally, a Harvester may be placed to complete the Combo.
Sea Stock Animals work a little different. The player must first place a Holding Tank followed by a Tank Filter. After both of those the player needs to place at least one of the Sea Stock’s Feed, followed by the Feeder, in that order. After that, a Harvester may be placed to complete the Combo.
Some cards have an X symbol. This symbol means the Basic Tool it covers cannot be used and is not necessary to use to complete the Combo. Players must skip the Tool the X covers as if they had already placed it.
Krill are particularly special. They don’t need to be fed or Harvested. In fact, after you place a Holding Tank and a Tank Filter, the Krill as a Combo is done. This is the only Feed that can apply its Profits without being Harvested. However, this means that Krill cannot be turned in for Profits as a standalone Animal, but instead can only produce Profits when used as Feed.
Optional Tools
You will notice a number of symbols in the Harvest Panel not encapsulated in red. These are Optional Basic Tools and are not necessary to complete the Combo, but are useful for bolstering Profits. There is no particular order they need to be played, except for playing them after or before any other cards in red. Look for the phrase “May be used” in Basic Tool Instructions to follow when to use them.
For example, most Crops may have a Fertilizer, Weeder, and Insect Defense placed in any order, but any and all of them must be placed after the Growth Phase and before the Harvester. Cattle, on the other hand, may have a Seed/Feed Mixer placed first, while the Innoculator may only be placed after the required Basic Tools and before the Harvester.
Limitations
There are a number of limitations that apply throughout the game. Let’s look at what those are.
- You must have a deck of no less than 50 cards.
- Your deck must not contain more than four uniquely named cards.
- You can only have a maximum hand of 7 at the end of your turn. This means you may have more throughout your turn, but after you have used your three Labors, you must discard down to seven. Cards discarded in this fashion do not count as a Labor and are placed in the Compost Pile.
- For Basic Tools in any single Combo, you may only place up to one of each Basic Tool Sub-Type. Likewise, only one Harvester may be used per Combo. For Basic Tools and Harvesters, there is an exception with regards to Nested Combos. However, even in Nested Combos, only one Advanced Tool, one Facility, and one Storage may be used in a Combo.
- For Animals, players may place either the Feed itself, or a fully Harvested Feed. However, Feed must not be used if its Combo has anything placed after the Harvester, nor must any cards be placed on the Feed after it has been placed on the Animal. Feed that was made in a Combo applies all of the Combo’s Profits to the Animal, whereas a Feed not in a Combo adds no Profits.
- Furthermore for Animals, players may choose to place a Seed or Feed Mixer before the required Feed. If they do so, they will need to place one of each Feed after the Mixer, although not in any particular order, and each Feed placed counts as a separate Labor.
- Nested Combos are an interesting exception to several limitations. A Nested Combo is made by placing a Feed made from a Combo onto an Animal. The first and second part of Limitation 4 are ignored between Combos. For example, if you had Cattle, you may place the Seed Mixer followed by a Combo of Sweet Corn and a Combo of Soybeans. These Combos ignore each other’s Cultivator Sub-Types, as well as any others, ignoring Limitation 4. This also means you may have an Animal Combo placed on another Animal as its Feed without worrying about the Harvesters or Basic Tool Sub-Types interfering as Limitation 4 normally would have them.
- Compost Piles must have all cards face up, and any player, within reason, may look through the cards in any Compost Pile. When looking through other player’s Compost Piles, please be courteous about it and limit yourself to only doing so when a card dictates.
Types, Classes, and Sub-Types
A Type refers to the broad types of cards. The Types are Crop, Animal, and Tool.
Classes are more general categories within card Types. As of now, these are found on Tool cards and currently include: Basic Tool, Harvester, Advanced Tool, Facility, and Storage.
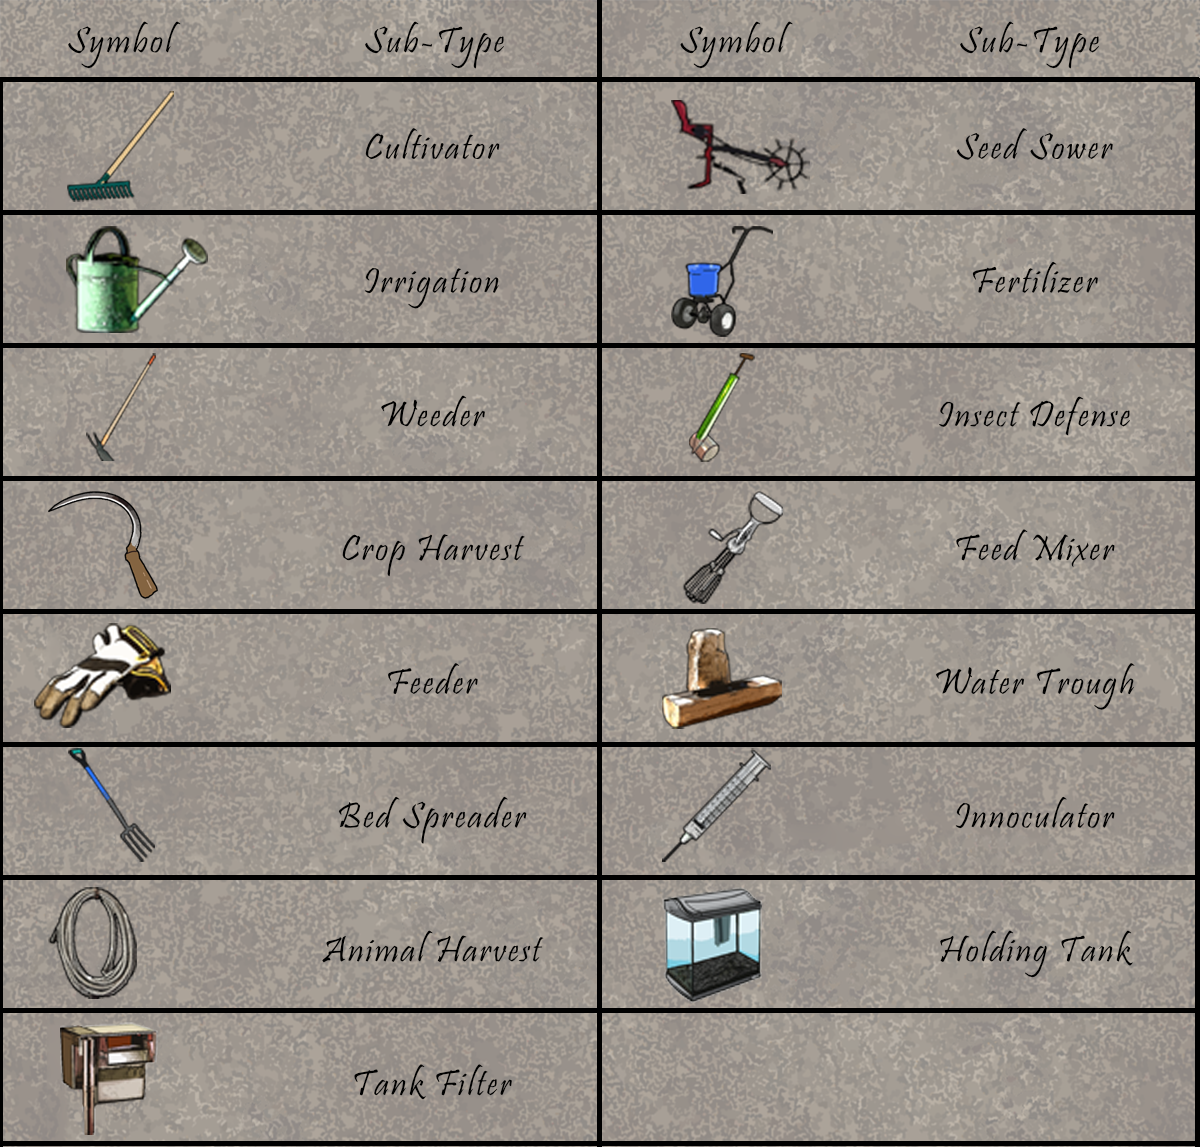
Sub-Types are more specific categories within card Types.
Here is a pictorial listing of the Sub-Types of Crops and Animals:

Here is a pictorial listing of the Sub-Types of Tools:
Glossary of Terms
- Crop: This card Type is denoted by a green border.
- Animal: This card Type is denoted by a blue border.
- Tool: A card Type that is used to grow and add Profits to Crops and Animals. This card Type is denoted by a gray border.
- Profits: The points a player attains from the various cards.
- Combos: Any Crop or Animal that has had Tools placed on it.
- Nested Combo: An Animal Combo that contains other Combos for its Feed.
- Top Value: The amount of Profits players attempt to reach to win.
- Market Die: A six-sided die.
- Minimum Requirement: The necessary Basic Tools and Harvester that must be placed on a Crop or Animal to complete its Combo and collect Profits.
- Farm Supply: The deck the player draws from.
- Labor: The action a player performs on their turn.
- The Farm: The general play area where a player places their Crops and Animals.
- Growth Phase: A necessary step for every Crop, used after an Irrigation Basic Tool, and denoted with a token or by turning the Combo sideways.
- Feed: Any Crop or Animal that is intended to be placed on an Animal Combo.
- Compost Pile: The discard pile.
- Recycle: The act of shuffling the Compost Pile to create a new Farm Supply.
- Must, May, Can, Cannot: When a card says “Must,” players are required to follow the proceeding Instruction. When a card says “May,” players can choose whether or not to follow the proceeding Instruction. When a card says “Can,” it is referring to a possibility. Finally, when a card says “Cannot,” it is referring to an impossibility.
